Last Updated: by Jeffrey Huber
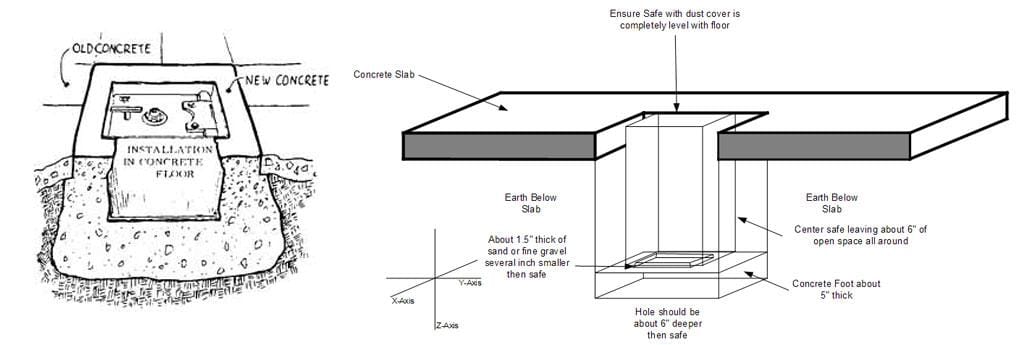
Table of contents
Guide for the proper Installation of Floor Safe
The variety of floor safes gives you the opportunity to use it in many different places
Plan ahead
- Determine the position you want, install your Floor Safe based on the accessibility, as you plan to place the safe (ie, under the carpet, furniture, etc.), and its proximity to water-sources ( sanitary lines).
- Choose a position that supports the lifestyle of your home, is easy to hide, and protects against the accidental discovery of burglars.
- Make sure to turn the safe so that the combination dial will be aligned in the right direction for the operation, if it is installed safely.
Installing in an Existing Concrete/Cement Floor: Step-by-step guide
You have to break through the concrete and dig a hole to cement the safe in the floor.
-
Determine the desired position. Use the tool of your choice, breakthrough concrete floor, and create a hole, the 12 " both longer and wider than the length and width of your floor is safe.
A upholstery of 6 " of concrete that surrounds the safe is recommended. The larger the amount of reinforced concrete that can be laid around the safe, the greater the safety.
-
Dig a hole under the floor about 6 " Customs more than the depth of the safe.
-
The hole is partially filled with approx. 5 " filling out of the concrete mix and letting in.
WARNING! By filling the hole in this step, your floor will safely protrude out of the floor. This creates a hazard warning and makes safe cover protection more difficult.
-
Pour “-1.5” made of fine sand or gravel on the bottom layer of the concrete.
-
With the dust cover on, position Floor Safe in the middle of the hole. Turn carefully and apply pressure on the safe until the dust cap with the upper floor is made of meat. Use a level to ensure accuracy.
-
Fill the remaining sides of the hole with concrete mix, so that the position of the safe is not disturbed.
-
Make sure that the top of the safe with the finished floor area is at the level.
-
Use a trowel to smooth the concrete and use shop towels to gently clean excess concrete from the dust cover.
-
Let the concrete set and dry.
-
Congratulations! Your Floor Safe is now installed.
Installing When Pouring a New Concrete/Cement Floor
The installation of a Floor Safe in a new concrete cement floor is similar to that of the installation in an existing concrete/cement floor. However, the installation of the Floor Safe should take place during the same period in which the foundation is cast. You may need to create a form to make the placement of the concrete around the Floor Safe (please consult a contractor). Make sure you are for the thickness of your floor (d. h. Wooden panels) so that if it is installed, it will be flush with the top of the safe.
- We recommend that you install the Floor Safe after you have the walls and rooftop. In this way, the safe will never rain (and fewer people know you have a safe).
Wooden Floor Installation
Wooden floors are usually in elevated foundations, and if you install a Floor Safe in an elevated foundation, you either need to build a wooden shape to keep safe between the floor and the floor, or a basket attached to the floor joists (depending on the size of the safe). The purpose of the form is to keep the concrete safe around the floor and shape it. The shape is best dressed out of wire mesh with roof cardboard. Wooden shapes can be used but should be removed after the concrete to prevent termites from entering the structure of your building. This process is also similar to the installation on an existing concrete floor. Cut a hole in the floor, safely put in the hole, and finish with cement to form the top of the safe flush with the floor.
Tips
We recommend that you consult a contractor before beginning the installation process.
- concrete mix: Use a concrete mix of 1, 2, 4 (1 part cement, 2 parts sand, 4 parts 3/4 " Stone). Mix thoroughly with water to the desired consistency.
- Cover the cover plate with cover tape in such a way that excess concrete can not seep between the door and the body of the safe and thus can cement in the door. After installation, you can let the concrete/cement dry for 24 hours before you use the safe.
- If safe is placed where water could run in safety, increase safely over the floor no more than 1 " over the finished floor, then the new cement from the safe level to the floor, or, if desired, can be made available.
- Make moisture-sensitive objects in sealed bags before storage in safety to prevent damage.
Jeffrey is a 35-year-old self-confessed gun nut who enjoys guns after the very first trip to the shooting range when he was 17 years old. Currently, he works in the firearms industry while in his free time shares his knowledge with everyone who desire to find his perfect gun.